I recently read about Meshtastic, a decentralised, off-grid network that lets you send and receive messages using affordable, low-power devices using the LoRa protocol.
I found the whole concept quite interesting, in that it allows you to keep comms in a situation where the grid is unreliable or fails, and broadcast information like GPS coordinates, all in an encrypted manner.
The devices are extremely low powered, and run for multiple days. The range varies considerably by device and environment, varying from ~2 km in an urban setting (with obstacles) to 100+ km with perfect line of sight.
While the mesh functionality depends on other nodes existing within range, you can always use direct communication between your devices.
It can always work as a backup, and as a way to ensure you can communicate with your “group” while doing activities like hiking.
Hardware Selection
There is a vast selection of hardware available that can be used with Meshtastic, ranging from portable nodes to solar-powered devices that are designed to be mounted up high on houses, trees, or mountains.
If you are curious to just try it out, the XIAO ESP32S3 & Wio-SX1262 Kit for Meshtastic is a tiny ESP32-based, USB-C powered unit, available from Seeedstudio for under 10€. The cost really isn’t a barrier preventing most people from trying this out.
My “Home” node
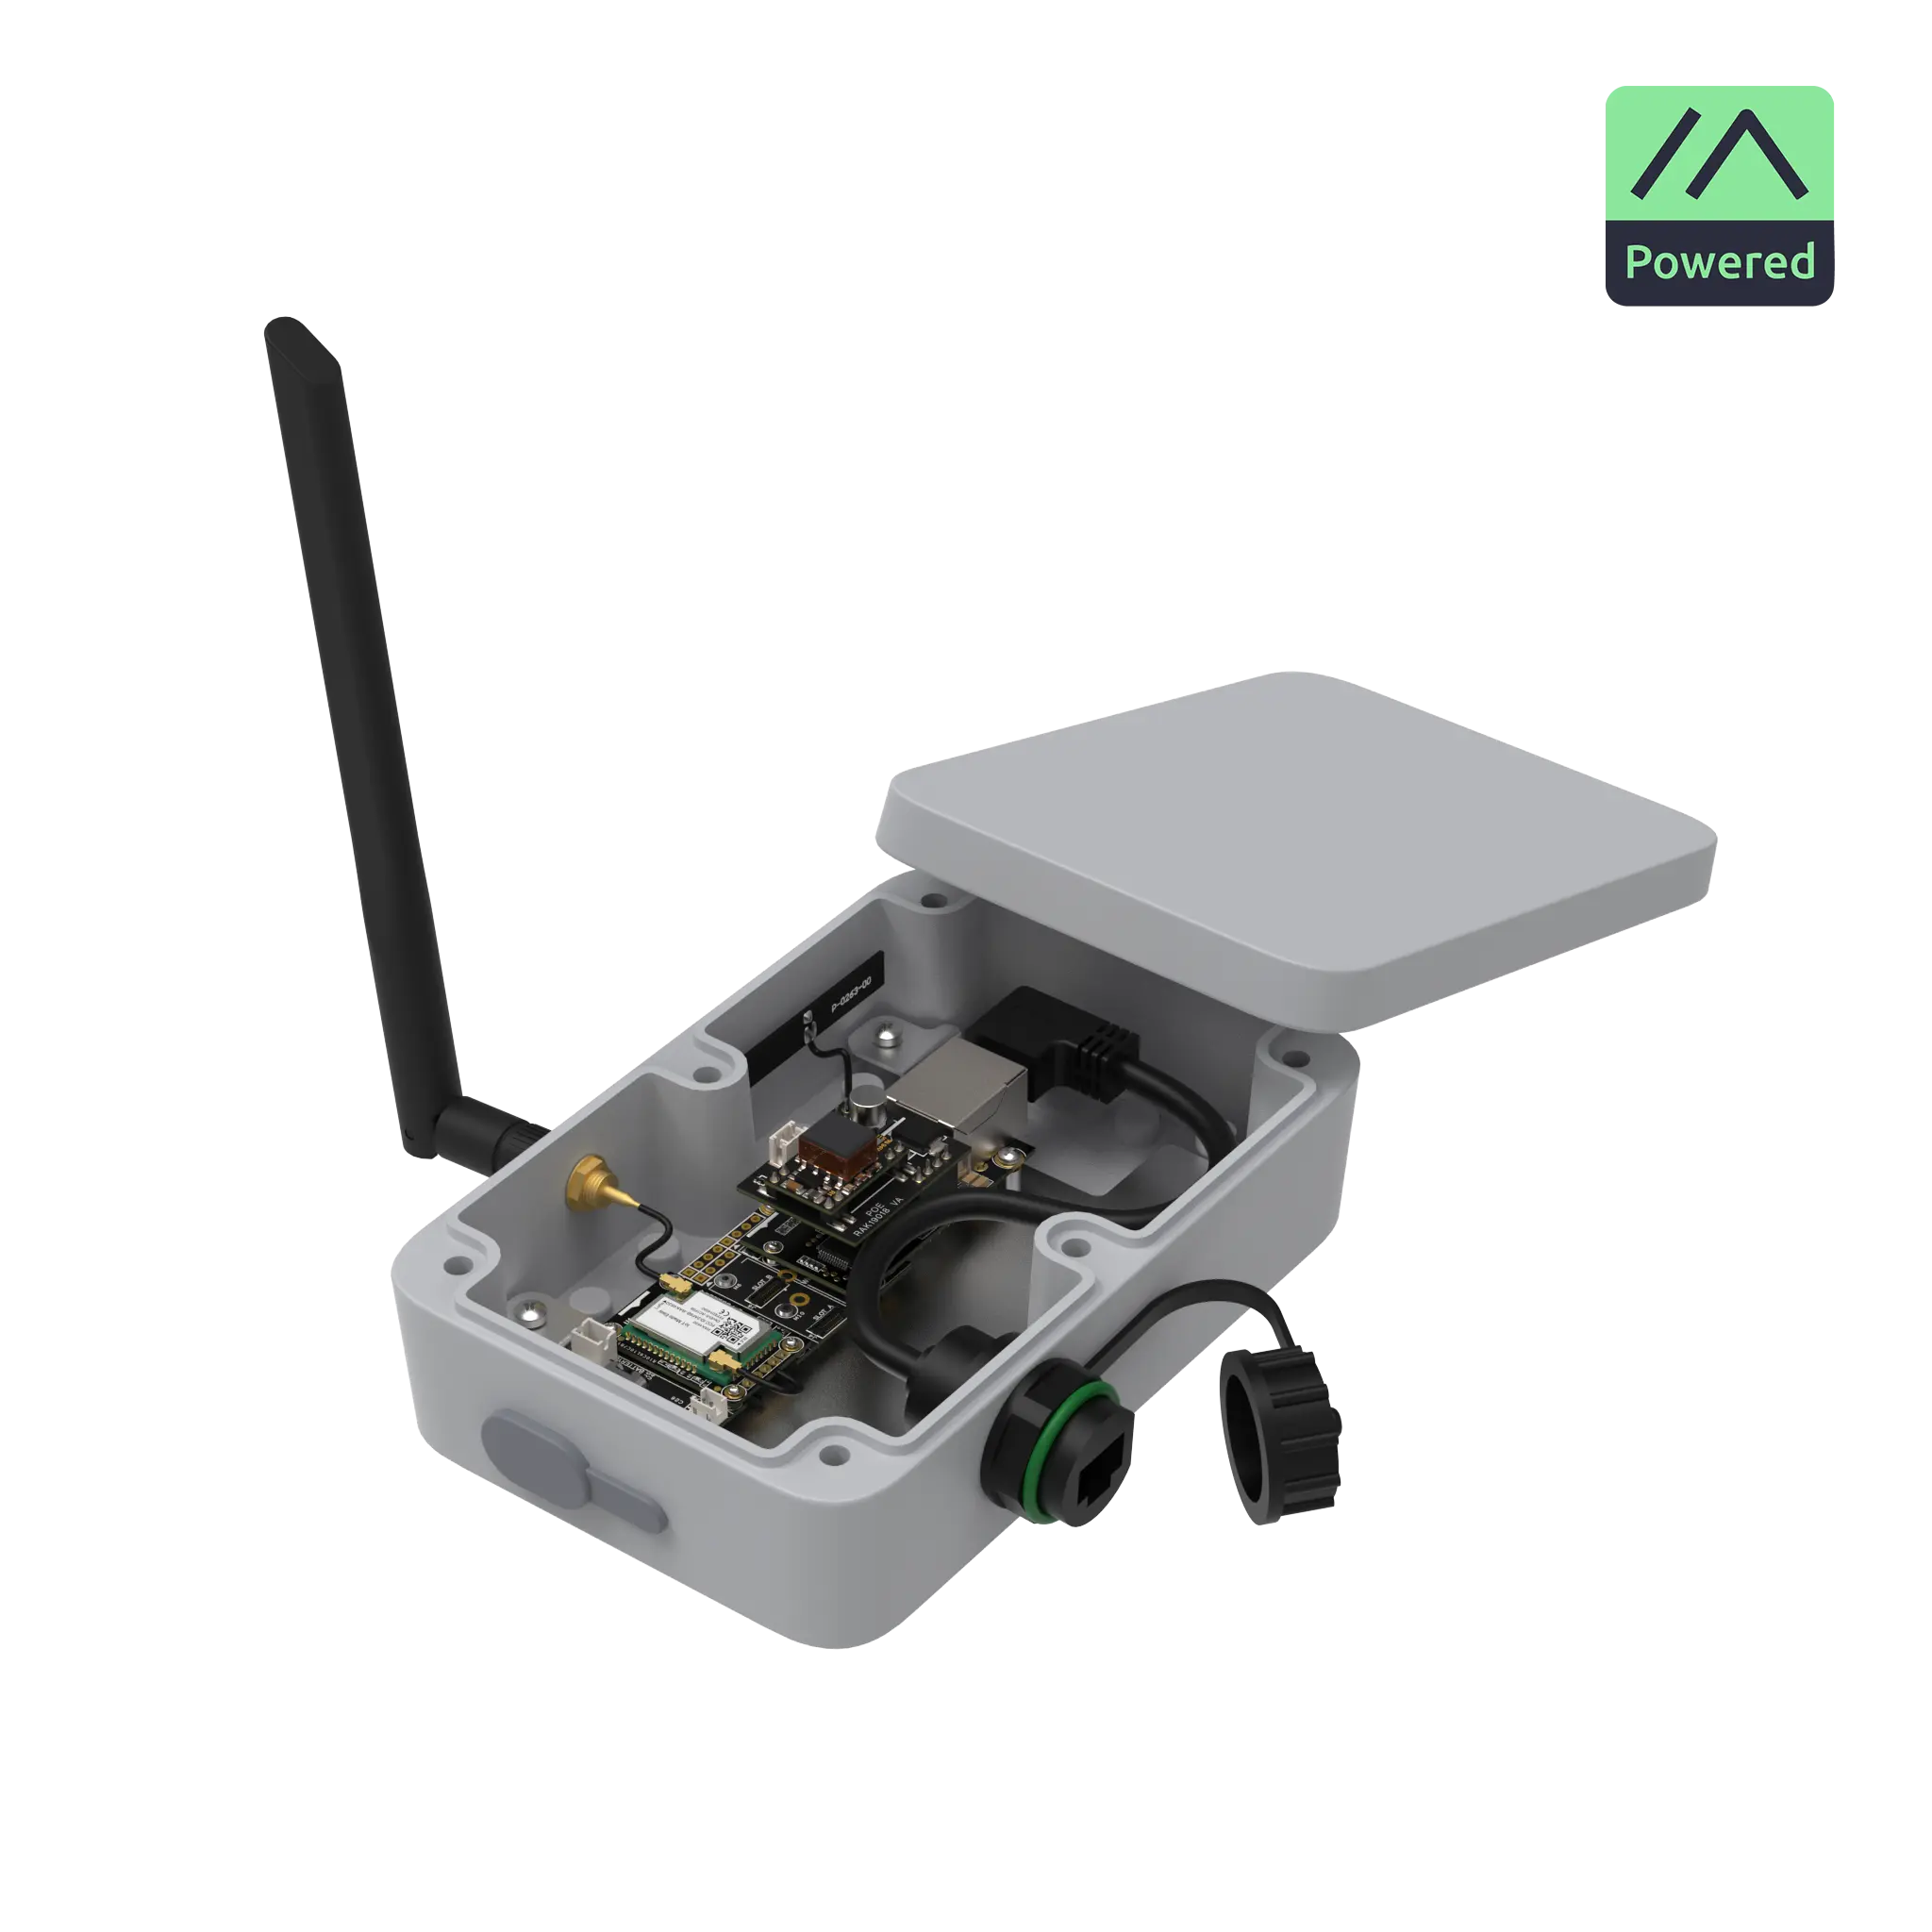
For use with my Home Assistant, I picked the Rak WisMesh Ethernet MQTT Gateway. I went for the POE version so that I could place it in my attic, or potentially even on the roof, where I wouldn’t have any alternative power source available. Ethernet is also convenient in that it allows connection to my Home Assistant without having to worry about WiFi or Bluetooth range.
The PoE powered Rak WisMesh Ethernet MQTT Gateway
Mobile nodes
I bought a pair of SenseCAP T1000-E Card Trackers, which have no display but connect to your phone over BLE for messaging. They can otherwise still work as pure trackers, even if not connected to a phone, providing position updates over Meshtastic.
The credit card sized SenseCAP T1000-E
Home Assistant Integration
While the official Meshtastic documentation doesn’t make it obvious, as it only mentions integration via MQTT, there is actually an official Home Assistant Meshtastic Integration which, in my experience, works really well. It allows you to set a node as a gateway, and to interact with the mesh from that node, all via Home Assistant.
You can send and receive messages (via notify. entities), as well as receive telemetry (sensor. entities) and position updates (device_tracker. entities) from connected nodes. The integration exposes a device for each selected node, allowing you to neatly manage all this information within Home Assistant. The integration also exposes the Meshtastic Web client via a bridge, allowing you to interact with it manually, should you want to.
Practical Automations
There are a few examples of how to handle automations on the integration’s GitHub page.
The easiest way is to create an automation that triggers on “Manual Events” and put meshtastic_api_text_message as the “Event Type”. This will cause this automation to be triggered on all incoming channel and direct messages. You can then add conditions to filter out what you need.
You can use the trigger data to pass basically all the information to/on the automation. It includes channel number, sender node id, receiver node id, and the content of the message. You can even use variables to map the channel and node id to a specific name, to make it more user friendly.
Forwarding Meshtastic messages to a notify.entity
I have set up an automation1 to forward any Meshtastic message received on my Home node to my phone (via telegram) and to my computer’s browser.
Receiving a message results in a notification that looks like this:
Telegram notification with the content forwarded from a Meshtastic message.
Code
Home Assistant automation code
alias: 📡 Meshtastic Message Forwardingdescription: Forward Meshtastic text messages to Telegram and HTML5 notificationstriggers: - trigger: event event_type: meshtastic_api_text_messageactions: - variables: channel_name: | {% if trigger.event.data.data.to.channel == 0 %} Private {% elif trigger.event.data.data.to.channel == 1 %} Public LongFast {% else %} Channel {{ trigger.event.data.data.to.channel }} {% endif %} from_name: | {% if trigger.event.data.data.from == 1728076892 %} Home Node {% elif trigger.event.data.data.from == 0493480507 %} Node One {% elif trigger.event.data.data.from == 0165807277 %} Node Two {% else %} Node {{ trigger.event.data.data.from }} {% endif %} formatted_message: > From: {{ from_name }} {{"\r\n"}} Channel: {{ channel_name }} {{"\r\n"}} Message: {{ trigger.event.data.data.message }} - data: message: "{{ formatted_message }}" title: 📡 Meshtastic data: channel: Meshtastic action: notify.telegram - data: message: "{{ formatted_message }}" title: 📡 Meshtastic data: channel: Meshtastic action: notify.html5mode: queued #this is to ensure you don't lose any message if multiple are received at the same time.max: 10
One of my potential use cases is to use these as a tracker within Home Assistant. Whereas myself and my partner have our phones tied to our person.entity, automatically setting a home or away state, my daughter doesn’t have a phone, and any relatives that are visiting don’t have their phones tracked for Home Assistant presence.
Having a couple of these Meshtastic devices means that I can just grab one from the drawer, press the button to turn it on and assign it to the “Guest” person, and… suddenly my smart home knows if they are around. This is especially handy to handle things like alarms or presence-based automations.
If/when my daughter eventually gets into a creche/preschool, it may also serve as a handy tracker that can just be placed in her bag.
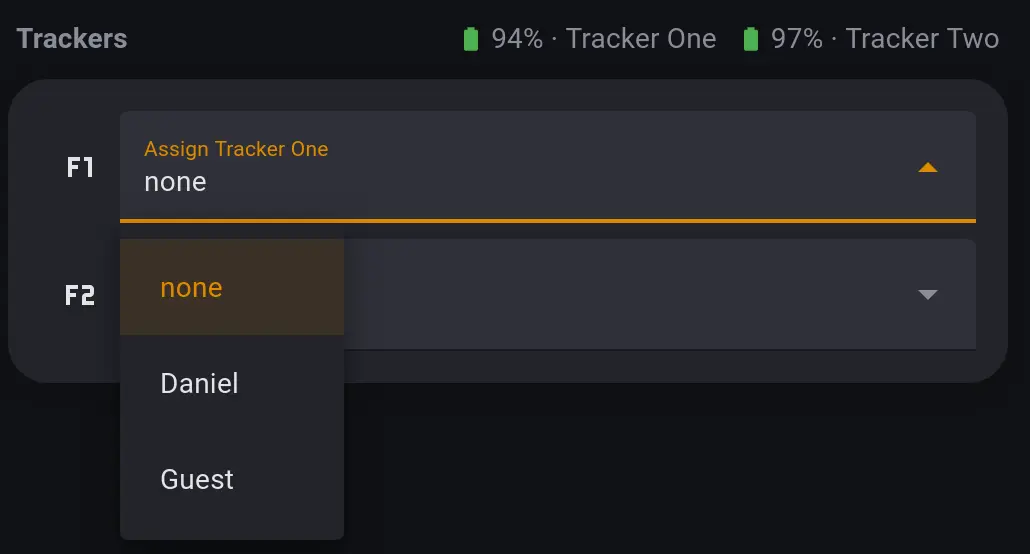
I have a small card in the Home Assistant dashboard where I can just quickly assign it to someone on the fly.
The card allowing me to assign either tracker to a person.
Requirements
Device trackers integrated into Home Assistant (in this case, Meshtastic nodes which expose a device_tracker.entity in Home Assistant).
The Spook integration, for the person.add_device_tracker and person.remove_device_tracker actions;
A input_select.helper for each tracker device, with a none option plus one entry for each person. I chose to use a “friendly” name in the helper, and then mapped them to the person.entities in the automation itself.
[{"id":"c9a171a3808645dd","type":"group","z":"452e1ff2f1b96636","name":"Add/remove device_tracker. to person. based on helper","style":{"label":true},"nodes":["4c36b89082bf8ee6","c151d90dec1e178f","02cf36a338467022","ac58893fd9ad6592","633b69cf9c382631","17b4ba6c34cfe4a3","78706565531503d5"],"x":34,"y":359,"w":1632,"h":162},{"id":"4c36b89082bf8ee6","type":"server-state-changed","z":"452e1ff2f1b96636","g":"c9a171a3808645dd","name":"Meshtastic node assignee changes","server":"17dfe268.5076de","version":6,"outputs":1,"exposeAsEntityConfig":"","entities":{"entity":["input_select.tracker_one","input_select.tracker_two"],"substring":[],"regex":[]},"outputInitially":true,"stateType":"str","ifState":"","ifStateType":"str","ifStateOperator":"is","outputOnlyOnStateChange":true,"for":"0","forType":"num","forUnits":"minutes","ignorePrevStateNull":false,"ignorePrevStateUnknown":false,"ignorePrevStateUnavailable":false,"ignoreCurrentStateUnknown":false,"ignoreCurrentStateUnavailable":false,"outputProperties":[{"property":"payload","propertyType":"msg","value":"","valueType":"triggerId"},{"property":"topic","propertyType":"msg","value":"","valueType":"entityState"}],"x":200,"y":440,"wires":[["633b69cf9c382631"]]},{"id":"c151d90dec1e178f","type":"api-call-service","z":"452e1ff2f1b96636","g":"c9a171a3808645dd","name":"Add device_tracker to person.","server":"17dfe268.5076de","version":7,"debugenabled":false,"action":"person.add_device_tracker","floorId":[],"areaId":[],"deviceId":[],"entityId":[],"labelId":[],"data":"{\t \"entity_id\": topic,\t \"device_tracker\": payload\t}","dataType":"jsonata","mergeContext":"","mustacheAltTags":false,"outputProperties":[],"queue":"none","blockInputOverrides":true,"domain":"person","service":"add_device_tracker","x":1490,"y":400,"wires":[[]]},{"id":"02cf36a338467022","type":"api-call-service","z":"452e1ff2f1b96636","g":"c9a171a3808645dd","name":"Remove device_tracker to person.","server":"17dfe268.5076de","version":7,"debugenabled":false,"action":"person.remove_device_tracker","floorId":[],"areaId":[],"deviceId":[],"entityId":[],"labelId":[],"data":"{\t \"entity_id\": topic,\t \"device_tracker\": payload\t}","dataType":"jsonata","mergeContext":"","mustacheAltTags":false,"outputProperties":[],"queue":"none","blockInputOverrides":true,"domain":"person","service":"remove_device_tracker","x":1500,"y":480,"wires":[[]]},{"id":"ac58893fd9ad6592","type":"ha-get-entities","z":"452e1ff2f1b96636","g":"c9a171a3808645dd","name":"get person entity with a meshtastic tracker","server":"17dfe268.5076de","version":1,"rules":[{"condition":"state_object","property":"entity_id","logic":"is","value":"person","valueType":"re"},{"condition":"state_object","property":"attributes.device_trackers","logic":"is","value":"ffdr","valueType":"re"}],"outputType":"array","outputEmptyResults":true,"outputLocationType":"msg","outputLocation":"data","outputResultsCount":1,"x":840,"y":440,"wires":[["17b4ba6c34cfe4a3"]]},{"id":"633b69cf9c382631","type":"change","z":"452e1ff2f1b96636","g":"c9a171a3808645dd","name":"change name to person.","rules":[{"t":"change","p":"topic","pt":"msg","from":"Daniel","fromt":"str","to":"person.daniel","tot":"str"},{"t":"change","p":"topic","pt":"msg","from":"Mia","fromt":"str","to":"person.mia","tot":"str"},{"t":"change","p":"topic","pt":"msg","from":"Guest","fromt":"str","to":"person.guest","tot":"str"},{"t":"change","p":"payload","pt":"msg","from":"input_select.tracker_one","fromt":"str","to":"device_tracker.meshtastic_tracker_one","tot":"str"},{"t":"change","p":"payload","pt":"msg","from":"input_select.tracker_two","fromt":"str","to":"device_tracker.meshtastic_tracker_two","tot":"str"}],"action":"","property":"","from":"","to":"","reg":false,"x":510,"y":440,"wires":[["ac58893fd9ad6592"]]},{"id":"17b4ba6c34cfe4a3","type":"function","z":"452e1ff2f1b96636","g":"c9a171a3808645dd","name":"function","func":"const payloadDevice = msg.payload;\n\n// Always send addition message first when topic is not \"none\"\nif (msg.topic !== \"none\") {\n const currentTopic = msg.topic;\n \n node.send({\n topic: currentTopic,\n payload: payloadDevice,\n action: \"add\"\n });\n \n // Get previous topic from context (node-specific storage)\n const previousTopic = context.get(payloadDevice + \"_previous_topic\");\n \n // If there was a previous topic and it's different from current\n if (previousTopic && previousTopic !== currentTopic) {\n // Send removal message for previous topic\n node.send({\n topic: previousTopic,\n payload: payloadDevice,\n action: \"remove\"\n });\n }\n \n // Store current topic as previous for next time\n context.set(payloadDevice + \"_previous_topic\", currentTopic);\n} else {\n // Handle \"none\" topic case - remove from whoever currently has it\n const previousTopic = context.get(payloadDevice + \"_previous_topic\");\n \n if (previousTopic) {\n // Send removal message for previous topic\n node.send({\n topic: previousTopic,\n payload: payloadDevice,\n action: \"remove\"\n });\n \n // Clear the previous topic since it's now unassigned\n context.set(payloadDevice + \"_previous_topic\", null);\n }\n}\n\n// Return null to not send the original message\nreturn null;","outputs":1,"timeout":0,"noerr":0,"initialize":"","finalize":"","libs":[],"x":1100,"y":440,"wires":[["78706565531503d5"]]},{"id":"78706565531503d5","type":"switch","z":"452e1ff2f1b96636","g":"c9a171a3808645dd","name":"","property":"action","propertyType":"msg","rules":[{"t":"eq","v":"add","vt":"str"},{"t":"eq","v":"remove","vt":"str"}],"checkall":"true","repair":false,"outputs":2,"x":1250,"y":440,"wires":[["c151d90dec1e178f"],["02cf36a338467022"]]}]
Conclusion
Meshtastic offers an interesting solution for off-grid communication that integrates surprisingly well with Home Assistant. What began as simple curiosity about decentralised networks and emergency communication capability has proven to be a surprisingly practical addition to my smart home setup, with flexible presence detection being an unexpected bonus.
The ability to maintain some basic communication during power outages or network failures gives me peace of mind, whilst the Home Assistant integration opens up creative automation possibilities. The flexible person tracking system can be particularly useful for guests and family members without tracked devices.
If you’re interested in emergency preparedness or off-grid communication, Meshtastic devices represent excellent value on their own. The learning curve is gentle, the community is helpful, and the potential applications extend well beyond basic messaging. Whether you’re hiking in remote areas, enjoying a festival with friends, or simply want a robust backup communication system, these devices can be relied upon when or where traditional networks fail.
For those already invested in the Home Assistant ecosystem, the integration opens up additional possibilities that make these cool gadgets even more fun to experiment with. The combination creates opportunities for creative automations and presence detection that, whilst not essential for emergency communication, certainly enhance the overall smart home experience.
Footnotes
Personally, I use Node-RED to handle my Home Assistant automations. When I first started using Home Assistant, Node-RED was both easier and more powerful to use than the native Automation functionality. I still prefer it as it makes it easier to organise and reuse parts of the automations. ↩