Using the docker network named cloudflared here means that the tunnel can only reach any container that you explicitly assign that network to.
When you bring the tunnel online you should see the status update in the Cloudflare configure page. Click Next.
In the Route Traffic page, under Public hostnames, you can create the entries that allow the domain to route traffic to your docker containers. This is basically a reverse-proxy.
Here I create a service1.example.com subdomain and point to a container service running on the same docker network, on port :8001.
You should then be able to externally access any containers via the domain entries you created.
What is a Cloudflare Tunnel and how do they work
Need to expose a local service online securely? Cloudflare Tunnels let you do it without opening inbound firewall ports.
A small program (cloudflared) on your server makes a secure, outbound-only connection to Cloudflare’s network. Public requests hit Cloudflare first, which then sends them safely through this encrypted tunnel to your local service. Your firewall stays closed to incoming threats.
Traditional Port Forwarding vs. Cloudflare Tunnels
The key difference lies in the connection direction and exposure:
Traditional Port Forwarding: You configure your firewall/router to allow inbound traffic on a specific port and forward it directly to an internal machine’s IP address and port. This directly exposes that internal port and potentially the machine itself to the internet, increasing your attack surface. You often need a static IP or complex Dynamic DNS setups.
Cloudflare Tunnels: Your server initiates an outbound connection to Cloudflare. Cloudflare handles the incoming public requests and sends them down the secure tunnel. Your firewall remains closed to inbound traffic for this service, and your origin server’s IP address is never directly exposed to the public internet for that connection. It works seamlessly even with dynamic IP addresses.
Security Advantages of Cloudflare Tunnels
Using Cloudflare Tunnels offers significant security benefits:
Reduced Attack Surface: By eliminating the need for open inbound firewall ports for your service, you drastically reduce potential entry points for attackers.
Hidden Origin IP: Your server’s public IP address isn’t exposed for the tunneled service, protecting it from direct scans and attacks. Traffic hits Cloudflare’s network first.
Encrypted by Default: Connections through the tunnel are inherently encrypted, securing data in transit between Cloudflare and your origin.
Leverages Cloudflare Security: Your tunneled service automatically benefits from Cloudflare’s infrastructure, including DDoS mitigation. You can easily layer on additional security like the Web Application Firewall (WAF) or Cloudflare Access (for Zero Trust authentication) before traffic even reaches your origin.
In short, Cloudflare Tunnels provide a simpler, more secure method for connecting private services to the internet.
Using the docker network named cloudflared here means that the tunnel can only reach any container that you explicitly assign that network to.
When you bring the tunnel online you should see the status update in the Cloudflare configure page. Click Next.
In the Route Traffic page, under Public hostnames, you can create the entries that allow the domain to route traffic to your docker containers. This is basically a reverse-proxy.
Here I create a service1.example.com subdomain and point to a container service running on the same docker network, on port :8001.
A sample public hostname entry for a Cloudflared tunnel
You should then be able to externally access any containers via the domain entries you created.
My setup using Caddy, with HTTPS everywhere
Below is an example of my docker compose and .env files for Caddy and the Cloudflare tunnel.
I use Caddy in order to be able to deploy all my self-hosted services with HTTPS and valid certificates.
You don’t have to use Caddy, and you don’t have to use HTTPS. This is just my preference, and I am sharing below my specific setup.
I specify a cloudflared network so that the tunnel can only access the Caddy container, and not any other container. I then use the caddynet network across any container that I want Caddy to reverse-proxy to.
My docker compose file for Caddy (with Cloudflare module) and Cloudflared tunnel
For simplicity and ease of backup, I prefer to use bind mounts (ie, mount a specific path on the host ) rather than using Docker volumes.
compose.yaml
services: ##### Caddy ##### caddy: container_name: caddy restart: always command: caddy run --config /etc/caddy/Caddyfile --adapter caddyfile image: ghcr.io/serfriz/caddy-cloudflare:latest # includes the necessary Cloudflare DNS module for certificate acquisition on non-exposed services volumes: - /path/on/host/caddy/config/:/config - /path/on/host/caddy/data/:/data - /path/on/host/caddy/Caddyfile:/etc/caddy/Caddyfile - /path/on/host/logs:/var/log/caddy env_file: - ./.env ports: # The exposed ports are not required for access via the tunnel, only for local access - 80:80 - 443:443 networks: - caddynet - cloudflared ##### Cloudflared ##### cloudflared: container_name: cloudflared restart: always command: tunnel run image: cloudflare/cloudflared:latest env_file: - ./.env networks: - cloudflared# networksnetworks: cloudflared: {} caddynet: {}
Creating the Cloudflare tunnel entries routing to Caddy
I want to have HTTPS across all my services, and as such I route every entry to my Caddy container, which then handles the reverse proxy to each specific container.
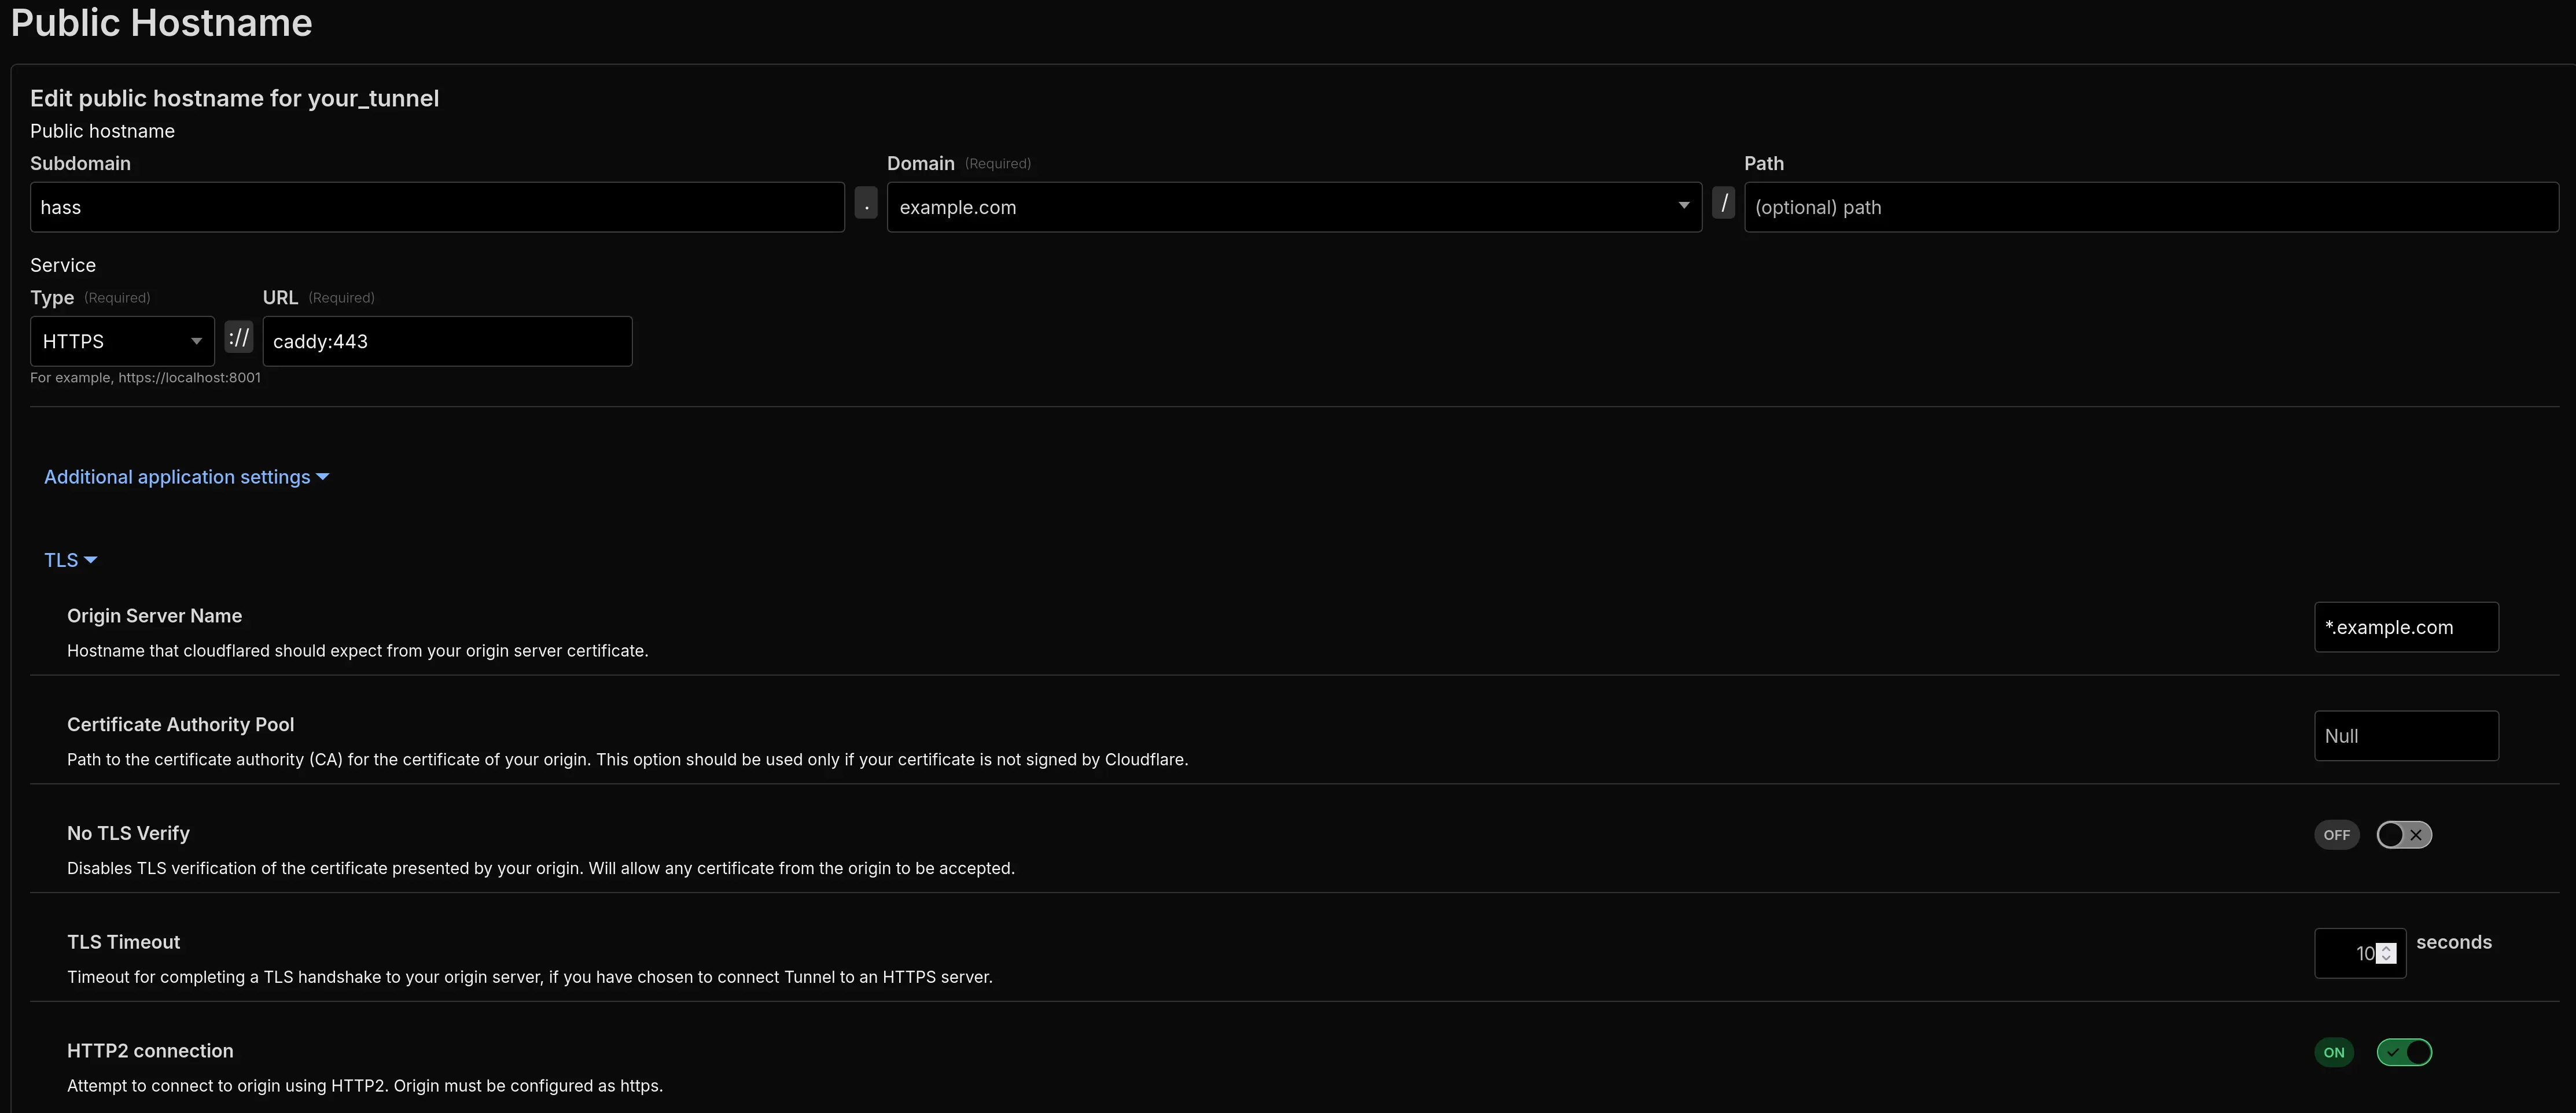
In the example below you can see I am routing hass.example.com to caddy:443. Caddy makes everything HTTPS, so I can select that option on the service type.
Under Additional application settings → TLS, I input the Origin Server Name as *.example.com (a wildcard certificate for my domain, automatically obtained via Caddy) and I enable the HTTP2 connection.
Creating an entry for a service to use the cloudflared tunnel
When you save, Cloudflare automatically creates the DNS entry for the subdomain, and you don’t have to go into the Cloudflare Dashboard and manually create them - you should be able to see the entry pointing to the cloudflared tunnel id.
The DNS entries pointing at the cloudflared tunnel, rather than an internal ip, is what makes external access possible.
You should create an entry for each service you are looking to expose.
You could alternatively create a single wildcard entry ( *.example.com), but in those situations no DNS entry is created. You would need to go into the Cloudflare Dashboard and manually create entries pointing to the cloudflared tunnel.
Once you’ve finished going through these steps, you should then be able to access your services via the subdomains you created from anywhere, not just your local network.
Securing the external access
When you allow external access to a service, someone (potentially a bot), somewhere, will check the “doors” and eventually try to break in. As such, it is absolutely critical to ensure you have some security put in place. There are 3 steps you can take to mitigate the risk:
Use the Cloudflare One / Zero Trust Access controls to limit who can access the domains. You could require the person to confirm their email, and only allow access based on a list of authorised emails (or just your own).
Set up mTLS via Cloudflare to only allow access to trusted devices where you have installed a specific certificate.
Cloudflare WAF rules
Go to the Cloudflare Dashboard for your domain → Security → WAF → Custom Rules, and you can select from the templates.
A basic rule expression is (ip.src.country ne "XX"), with the action selected to Block. This will block any incoming request that is not from country XX.
A Cloudflare WAF rule blocking any incoming connection from an IP that does not originate in Ireland
Save and deploy the rule. This will provide a very basic level of defence.
mTLS via Cloudflare
This is my preferred method to protect any self-hosted service that is publicly exposed to the internet.
I go over what it is and how to set it up in extensive detail here.
Conclusion: Secure and Simplified External Access
Cloudflare Tunnels represent a paradigm shift in how we approach exposing services to the internet. By inverting the traditional networking model, they provide a robust, secure, and flexible solution for self-hosted services.
They eliminate complex port forwarding and firewall configurations, and allow you to easily expose services with minimal configuration.
Stay safe
It is critical that you take steps to secure the external access.
Remember that external access, while convenient, always introduces potential risks.
Ensure you use strong authentication on any exposed services, and implement a principle of least privilege. Don’t expose anything unnecessarily.
Consider safer alternatives if you only need occasional external access, such as Tailscale.